Dialogs are a way to present users with a simple
input form. They are commonly used for small user tasks like filling in
report values, running batch jobs, presenting only the most important
fields to the user when creating a new record, etc. Dialogs are normally
created from X++ code without storing actual layout in AOT.
The application class Dialog is used to build dialogs. Other application classes like DialogField, DialogGroup, DialogTabPage, and so on, are used to create dialog controls. One of the common ways is to use dialogs within RunBase framework classes that need user input.
In this example, we will see how to build a dialog from code using the RunBase
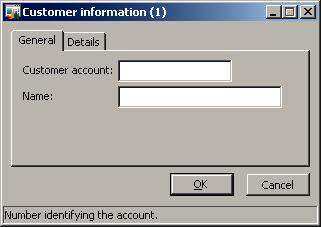
framework class. The dialog will contain customer table fields shown in
different groups and tabs for creating a new record. There will be two
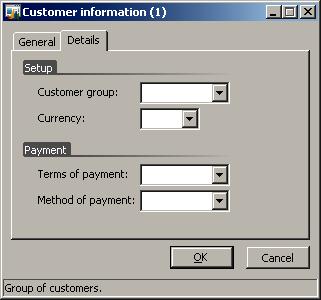
tab pages, General and Details. The first page will have Customer account and Name input controls. The second page will be divided into two groups, Setup and Payment,
with relevant fields. The actual record will not be created, as it is
out of scope of this example. However, for demonstration purposes, the
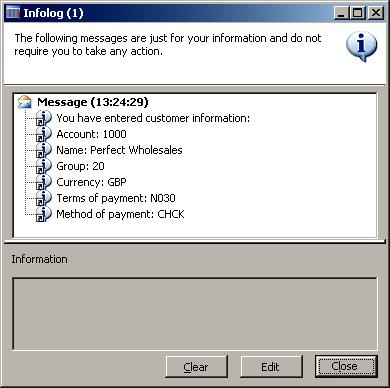
information specified by the user will be displayed in the Infolog.
How to do it...
1. Open AOT, and create a new class CustCreate with the following code:
class CustCreate extends RunBase
{
DialogField fieldAccount;
DialogField fieldName;
DialogField fieldGroup;
DialogField fieldCurrency;
DialogField fieldPaymTermId;
DialogField fieldPaymMode;
CustAccount custAccount;
CustName custName;
CustGroupId custGroupId;
CurrencyCode currencyCode;
CustPaymTermId paymTermId;
CustPaymMode paymMode;
}
public container pack()

{
return connull();
}
public boolean unpack(container packedClass)

{
return true;
}
protected Object dialog()

{
dialogsdialogscreating, stepsDialog dialog;
DialogTabPage tabGeneral;
DialogTabPage tabDetails;
DialogGroup groupCustomer;
DialogGroup groupPayment;
;
dialog = super();
dialog.caption("Customer information");
tabGeneral = dialog.addTabPage("General");
fieldAccount = dialog.addField(
typeid(CustVendAC),
"Customer account");
fieldName = dialog.addField(typeid(CustName));
tabDetails = dialog.addTabPage("Details");
groupCustomer = dialog.addGroup("Setup");
fieldGroup = dialog.addField(typeid(CustGroupId));
fieldCurrency = dialog.addField(typeid(CurrencyCode));
groupPayment = dialog.addGroup("Payment");
fieldPaymTermId = dialog.addField(typeid(CustPaymTermId));
fieldPaymMode = dialog.addField(typeid(CustPaymMode));
return dialog;
}
public boolean getFromDialog()

{;
custAccount = fieldAccount.value();
custName = fieldName.value();
custGroupId = fieldGroup.value();
currencyCode = fieldCurrency.value();
paymTermId = fieldPaymTermId.value();
paymMode = fieldPaymMode.value();
return true;
dialogsdialogscreating, steps}
public void run()
{;
info("You have entered customer information:");
info(strfmt("Account: %1", custAccount));
info(strfmt("Name: %1", custName));
info(strfmt("Group: %1", custGroupId));
info(strfmt("Currency: %1", currencyCode));
info(strfmt("Terms of payment: %1", paymTermId));
info(strfmt("Method of payment: %1", paymMode));
}
static void main(Args _args)

{
CustCreate custCreate = new CustCreate();
;
if (custCreate.prompt())
{
custCreate.run();
}
}
2. To test the dialog, run the class. The following form should appear with the General tab page open initially:
3. When you click on the Details tab page, you will see the following screen:
4. Enter some information into the fields, and click OK. The results are displayed in the Infolog:
How it works...
Firstly, we create a new class CustCreate. By extending it from RunBase, we utilize the standard approach of running such kinds of dialogs. RunBase
will also automatically add the required buttons to the dialog. Then we
declare class member variables, which will be used later. DialogField type variables are actual user input fields. The rest are used to store the values returned from user input.
The pack() and unpack()
methods are normally used to convert an object to a container, which is a
format to store an object in the user cache (SysLastValue) or to
transfer it between Server and Client tiers. RunBase requires those two methods to be present in all its subclasses. In this example, we are not using any of the pack()/unpack() features, but because those methods are mandatory, we return an empty container from pack() and true from unpack().
The layout of the actual dialog is constructed in the dialog()
member method. Here, we define local variables for the dialog itself,
tab pages, and groups. Those variables, as opposed to the dialog fields,
do not store any value to be processed further.
The super() of the RunBase framework creates the initial dialog object for us. The object is created using the Dialog application class. The class actually uses the Dynamics AX form as a base, automatically adds the relevant controls, including OK and Cancel buttons, and presents it to the user as a dialog.
Additional dialog controls are added to the dialog by using the addField(), addGroup(), and addTabPage() methods. There are more methods to add different types of controls like addText(), addImage(), addMenuItemButton(),
and others. All controls have to be added to the dialog object
directly. Adding an input control to groups or tabs is done by calling addField() right after addGroup() or addTabPage().
In the example above, we add tab pages, groups, and fields in logical
sequence, so every control appears in the right position.
The method returns a prepared dialog object for further processing.
Values from the dialog controls are assigned to variables by calling the value() member method of DialogField. If a dialog is used within the RunBase framework, as in this example, the best place to assign dialog control values to variables is the getFormDialog() member method. RunBase calls this method right after the user clicks OK.
The main processing is done in run(). For demonstration purposes, this example contains only variable output to Infolog.
In order to make this class runable, the static method main() has to be created. Here, we create a new CustCreate object, invoke user dialog by calling prompt(), and once the user finishes entering customer details by clicking OK, we call run() to process the data.